
With the New Teams app now GA, organizations will gradually transition from “Teams Classic” to the “New Teams” app. The main motivation for this shift is likely the performance improvements. While testing the new Teams, I discovered that custom backgrounds—whether added manually or through remediations—do not migrate to the New Teams. I investigated where backgrounds are stored in the new Teams and how to deploy them using remediations. This approach lets you provide custom backgrounds to your users without needing a Teams Premium license.
This article focuses on incorporating backgrounds for New Teams. For those still using classic Teams, refer to my previous post here. I will be applying the same blob storage method detailed in that post, so I won’t repeat the initial steps. There’s one additional prerequisite for new Teams, but the overall process remains similar, with some path adjustments.
To avoid unnecessary details, the new Teams app is an MSIX package, resembling a Microsoft Store application rather than a conventional MSI/EXE installer. Let’s briefly check the app details using get-appxpackage in PowerShell:
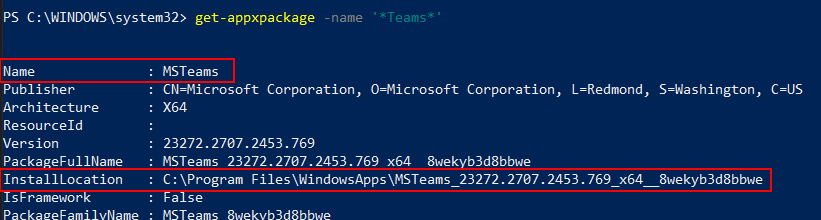
We can see the installation path directs to C:\Program Files\WindowsApps. However, similar to classic Teams, the new Teams stores some data in the local user profile (where backgrounds and other cached information reside). This data pertains to the Teams sign-in profile and is located in %LOCALAPPDATA%\Packages\MSTeams_8wekyb3d8bbwe.
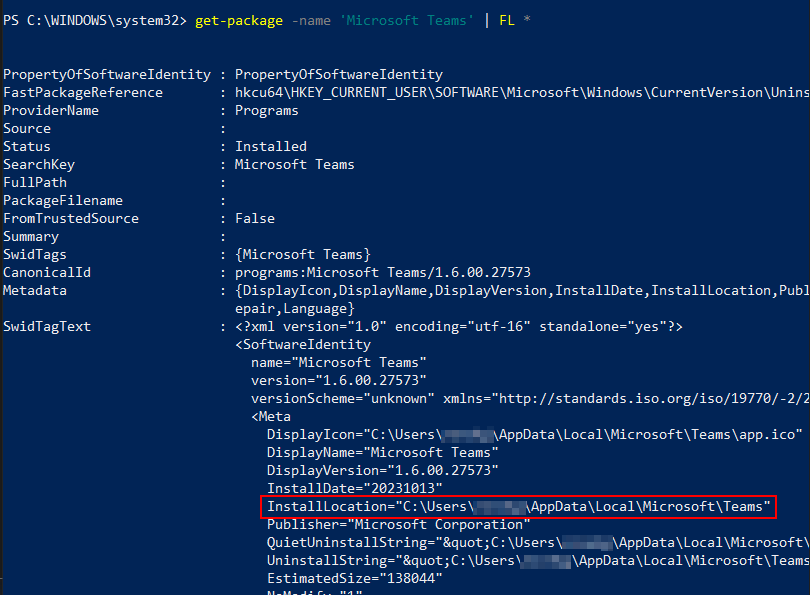
For Teams Classic, we can use get-package (as it isn’t an MSIX) and observe that it’s installed for each user in their profile. If you’re utilizing the Machine-Wide installer, it will be found at C:\Program Files (x86)\Teams Installer; however, each user on the device still has Teams installed in their local profile upon their first sign-in.
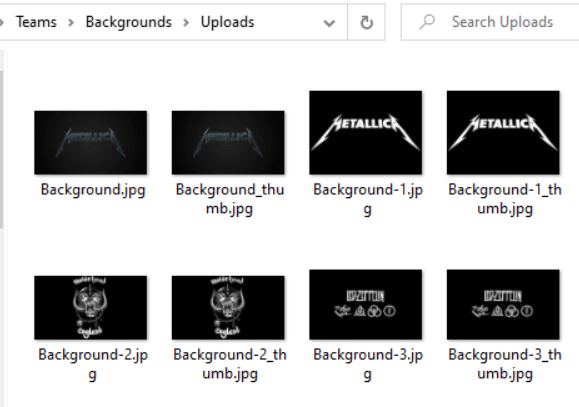
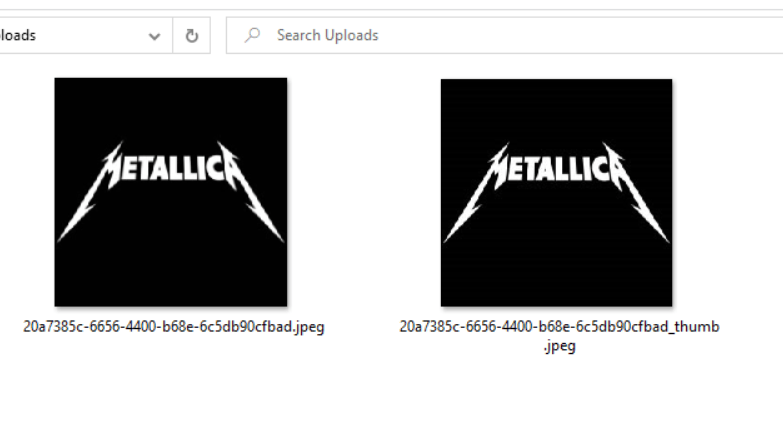
Now that we’ve covered some key differences regarding installation and file paths, let’s discuss how to add custom backgrounds to New Teams. If your organization is running New Teams alongside Teams Classic, your backgrounds will NOT carry over to the new Teams unless you hold Teams Premium licensing and are deploying backgrounds through the Teams admin center. Classic Teams utilizes the directory %appdata%\Microsoft\Teams\Backgrounds\Uploads. In Classic Teams, we can simply add images to this directory, and the app will automatically generate thumbnails of the images, as shown below:
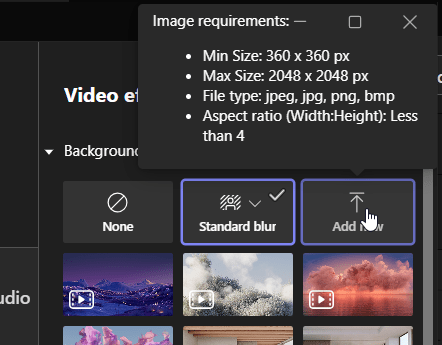
New Teams, on the other hand, utilizes the directory %LOCALAPPDATA%\Packages\MSTeams_8wekyb3d8bbwe\LocalCache\Microsoft\MSTeams\Backgrounds\Uploads. I discovered this path by manually adding a new image through the Teams App. This can be done from a meeting or the meeting lobby by selecting Video Effects > Backgrounds > Add New:
Here’s an interesting twist: my original test image named “ozzy.jpeg” was renamed to 2dcf91dd-0b21-4266-bd5e-eb3dca976b9e.jpeg after adding it.
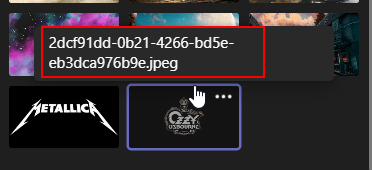
To verify this, I added another image for confirmation. New Teams assigns a UUID to the image as its name and also generates a smaller image for the thumbnail. If you drag and drop images into this directory without adhering to this naming convention, New Teams will not recognize them.
Thus, Teams is capturing your image and assigning it a UUID.jpeg name, creating a UUID_thumb.jpeg file, which is then placed in the %LOCALAPPDATA%\Packages\MSTeams_8wekyb3d8bbwe\LocalCache\Microsoft\MSTeams\Backgrounds\Uploads directory. We can see ms-teams.exe executing this in procmon during the process of adding a background manually:

The reason I refer to it as a curveball is that this is a fundamental difference between adding backgrounds to classic and new Teams. If your image does not follow the UUID.jpeg naming convention, and there isn’t a corresponding UUID_thumb.jpeg, the background will remain unavailable. While I referenced jpeg, compatible formats also include jpg, png, and bmp. The images must adhere to this naming format for New Teams to recognize them.
Now, let’s shift to our remediation to deploy the background images to users. As mentioned earlier, I am diving directly into this remediation since the storage account aspect is already covered in my other post on Classic Teams. My first remediation script draft was functional but made it difficult to implement a detection script. I focused too much on the remediation script and ended up with no accurate way to verify if the backgrounds were deployed since each image on each device had a unique UUID name. Initially, the remediation downloaded the image files generating a new UUID for each image, then copied them along with their UUID and UUID_Thumb equivalents to the backgrounds directory. This worked fine, but the detection became problematic. I considered using a dummy file or a text list in the backgrounds directory, but that was not ideal as the actual image files wouldn’t be the detection source. I scrapped that idea and pulled the renaming process out of the script.
Thus, the most logical approach is to generate the UUID and rename the files before uploading them to the storage account. By doing this, the backgrounds will conform to the necessary unique naming convention while maintaining identical names on each workstation, allowing our detection rule to accurately check for the existence of both UUID.jpeg and UUID_Thumb.jpeg images. This is achieved by retrieving the names of all files in the storage account and comparing them with those on the local machine. If any files are missing, the remediation will activate. This also lets you dynamically add new backgrounds to the storage account without needing to adjust the scripts.
Before uploading your images to the blob storage, ensure they are renamed appropriately. If you already have a collection of background images, the following script will generate two copies of each background: one named uuid.jpeg and the other uuid_thumb.jpeg (or with the respective extension of your images). This script, along with the remediation scripts, can be found on GitHub. Simply place all your backgrounds in a directory, set that directory as the $backgroundsdir variable, and run the script. The script only processes compatible image files (jpeg, jpg, png, and bmp). A new directory named RenamedBackgrounds will be created containing the copied and renamed files.
#Directory where your images are stored (Change $backgroundsdir to your location)
$backgroundsdir = "C:\temp\TeamsBackgrounds"
$renamedbackgrounds = New-Item -Path "$backgroundsdir" -Name RenamedBackgrounds -ItemType Directory -Force

#Rename JPEG files
$jpegimages = get-childitem $backgroundsdir -filter "*.jpeg"
foreach ($jpegimage in $jpegimages)
{
$uuid = new-guid
$name = "$uuid.jpeg"
$thumbname = "${uuid}_thumb.jpeg"
$newnamedestination = Join-Path -Path $renamedbackgrounds -ChildPath $name
$newthumbdestination = Join-Path -Path $renamedbackgrounds -ChildPath $thumbname
Copy-Item -Path $jpegimage.FullName -Destination $newnamedestination
Copy-Item -Path $jpegimage.FullName -Destination $newthumbdestination
}

#Rename JPG Files
$jpgimages = get-childitem $backgroundsdir -filter "*.jpg"
foreach ($jpgimage in $jpgimages)
{
$uuid = new-guid
$name = "$uuid.jpg"
$thumbname = "${uuid}_thumb.jpg"
$newnamedestination = Join-Path -Path $renamedbackgrounds -ChildPath $name
$newthumbdestination = Join-Path -Path $renamedbackgrounds -ChildPath $thumbname
Copy-Item -Path $jpgimage.FullName -Destination $newnamedestination
Copy-Item -Path $jpgimage.FullName -Destination $newthumbdestination
}

#Rename PNG Files
$pngimages = get-childitem $backgroundsdir -filter "*.png"
foreach ($pngimage in $pngimages)
{
$uuid = new-guid
$name = "$uuid.png"
$thumbname = "${uuid}_thumb.png"
$newnamedestination = Join-Path -Path $renamedbackgrounds -ChildPath $name
$newthumbdestination = Join-Path -Path $renamedbackgrounds -ChildPath $thumbname
Copy-Item -Path $pngimage.FullName -Destination $newnamedestination
Copy-Item -Path $pngimage.FullName -Destination $newthumbdestination
}

#Rename BMP Files
$bmpimages = get-childitem $backgroundsdir -filter "*.bmp"
foreach ($bmpimage in $bmpimages)
{
$uuid = new-guid
$name = "$uuid.bmp"
$thumbname = "${uuid}_thumb.bmp"
$newnamedestination = Join-Path -Path $renamedbackgrounds -ChildPath $name
$newthumbdestination = Join-Path -Path $renamedbackgrounds -ChildPath $thumbname
Copy-Item -Path $bmpimage.FullName -Destination $newnamedestination
Copy-Item -Path $bmpimage.FullName -Destination $newthumbdestination
}
A short gif demonstrating the script in action is provided below:

Next, upload the renamed files to your blob storage:
Establish your remediation using the detection/remediation scripts. Remember to modify them for your storage account and ensure that the script executes as the logged-in user. Below are the scripts (also available on GitHub):
Detection:
#Checks for Az.Storage module and installs if it doesn't exist
Write-Host "Checking for Az.Storage Module..." -ForegroundColor Green
$azstoragemodule = Get-Module -name Az.Storage
if ($azstoragemodule -eq $null) {
Install-PackageProvider -Scope CurrentUser -Name NuGet -MinimumVersion 2.8.5.201 -Force
install-module az.storage -scope currentuser -Force
}

#Connects to storage account and pulls background image file names
$BlobURL = "https://.blob.core.windows.net/"
$container="backgrounds"
$storageaccount = New-AzStorageContext -Anonymous -BlobEndpoint $BlobURL
$blobs = Get-AzStorageBlob -Container $container -Context $storageaccount
$Images = $Blobs.name
$BackgroundDir = "$env:LOCALAPPDATA\Packages\MSTeams_8wekyb3d8bbwe\LocalCache\Microsoft\MSTeams\Backgrounds\Uploads"
$Backgrounds = Get-ChildItem $BackgroundDir | Select -ExpandProperty Name -ErrorAction SilentlyContinue

#compare file names to see if they exist in the teams backgrounds destination
$FileComparison =
foreach ($image in $images)
{
$image -in $backgrounds
}

Write-Host "Checking to see if blob container images already exist..." -ForegroundColor Green
If ($FileComparison -contains $False) {
Write-Output "Background Images are Missing"
exit 1
}
else {
Write-Output "All background images exist"
exit 0
}
Remediation:
#Check for Teams Backgrounds Directory and create if it doesn't exist
Write-Host "Checking for Teams background directory..." -ForegroundColor Green
$BackgroundDir = "$env:LOCALAPPDATA\Packages\MSTeams_8wekyb3d8bbwe\LocalCache\Microsoft\MSTeams\Backgrounds\Uploads"
$DirExists = Test-Path $BackgroundDir
If ($DirExists -ne $True) {
New-Item -Path "$env:LOCALAPPDATA\Packages\MSTeams_8wekyb3d8bbwe\LocalCache\Microsoft\MSTeams\Backgrounds" -Name Uploads -ItemType Directory
}

#Checks for Az.Storage module and installs if it doesn't exist
Write-Host "Checking for Az.Storage Module..." -ForegroundColor Green
$azstoragemodule = Get-Module -name Az.Storage
if ($azstoragemodule -eq $null) {
install-module az.storage -scope currentuser -Force
}

#Variables for blob connection and download
$BlobURL = "https://.blob.core.windows.net/"
$container="backgrounds"
$storageaccount = New-AzStorageContext -Anonymous -BlobEndpoint $BlobURL
$blobs = Get-AzStorageBlob -Container $container -Context $storageaccount
foreach ($blob in $blobs)
{
Get-AzStorageBlobContent -Container $container -Blob $blob.Name -Destination $BackgroundDir -Context $storageaccount -Force
}
Here are the scripts in action:
Then, let the detection and remediation scripts manage your backgrounds for New Teams 🙂 *Note, if you utilize the same storage account for both classic and new teams backgrounds, ensure you create different containers.
Leave a Reply