If you want to deploy Office 365 applications from a share on the network manually, by using scripting tools or just to save in internet bandwidth then you need the Office Deployment tool.
There are five basic steps to using the tool for deploying Office apps:
- Download and install the Deployment Tool
- Setup a server share to deploy the apps from.
- Edit the configuration file to choose what files you want to install or exclude.
- Use the tool to download the installation files to a server share.
- Run a command on the PC’s to install the apps.
If you are lucky enough to have E3 or higher licenses assigned to your users then you can also use your included InTune license to automatically deploy Office Pro Plus. You can always buy the InTune licenses separately if you want too.
Read how to do that here: https://docs.microsoft.com/en-us/microsoft-365/enterprise/deploy-office-proplus-intune
Installing Office Click to Run from a Server Share
Lets get back on track and for those of us with a large deployment of Office 365 Business Premium or other similar subscription which includes the Click to Run version of office our options are:
- Install the software manually as an administrator on each device.
- Use our RMM tools to script the instillation from a server share. (Essentially launching the installation as a local Administrator)
I’m going to show how you can deploy office from a server share then later demo how to do this using an RMM tool.
Lets get started!
Download the Tool
Download the Office Deployment tool to your file server from here: https://www.microsoft.com/en-us/download/details.aspx?id=49117 the tool set includes a setup application and a configuration.xml file which is used to define what applications you want to download and how you want them to be installed to the PC’s.

Setup a Share
Next lets setup a folder share on the server from which PC’s on the network will install the software. In the lab i’m using \\dc01\software and under that share I have a folder called office. Inside the office folder I have a folder for the deployment tool ‘OfficeDeploymentTool’.
Edit the configuration .xml Files
Lets take a look at the available options in the configuration .xml files. There are three configuration files. One is used to install the 32 bit version of Office, One for the 64 bit version and the third to install the Volume Licensing version.
Open up the configuration file you require in notepad to view and edit the configuration. In this example we are going to install the 64 bit edition of Office 365 for the E3 License.

Below is the default configuration. This file will download the 64 bit version of the Office 365 Pro Plus Retail which is licensed in the E3 and higher plans. The example file will also install Visio Pro retail.
There are three options below the program configuration options:
Updates: Remove the comment tags <!– and –> to enable monthly automatic updates.
Display: Uncomment this option to automatically accept the license agreement so that it doesn’t get displayed during the installation.
Property: Uncomment this line to automatically activate office during the installation.

The example configuration file needs to be edited so that the office software is downloaded from the server rather than direct from the internet. To do this add the SourcePath attribute pointing to the server share.
The first line we can configure includes the options for 32 bit or 64 bit versions of the office applications you are installing, the default is 32 to install the 32 bit edition. Next we specify how often the applications are updated. The Monthly channel is the default which means all new features and updates will be installed on a monthly basis.
In this example I am using Office 365 E3 licenses so the Product ID is “O365ProPlusRetail” but if you were installing for the Business Premium License you will need to install the Business retail version of office. If you need to install for Business Premium change the Product ID to “O365BusinessRetail”.
In our lab I also un-comment the additional configuration options so that office automatically updates on a monthly basis, accepts the license agreement and auto activates the application.
You will also notice here that I have remove the section Product ID section for Visio. Removing this from the configuration file will mean it wont get installed.

If you don’t want to install the latest updates as they get released you can delay updates by setting the channel to Targeted or Broad. Below is a table explaining the different update channels. Change the Channel attribute in the configuration.xml file to the ID below depending on what channel you want.
| Channel Name | I D | Ideal For | Updates Install |
| Monthly | Monthly | Suited for developers and support staff. | The latest features are installed on a monthly basis. |
| Semi-Annual Channel (Targeted) | Targeted | Suited for a small portion of your user base to test applications allwork correctly. | The latest features are installed twice a year. ( March and September ) |
| Semi-Annual Channel | Broad | Suitable for all users, this is the final update channel. | The latest features are installed twice a year after the targeted channel receives the updates first. ( January and July ) |
Specify Products
Use the table below to select the correct Product ID based on what licenses you are using.
| Licenses | Product ID |
| Office 365 ProPlus Office 365 Enterprise E3 Office 365 Enterprise E4 Office 365 Enterprise E5 Office 365 Midsize |
“O365ProPlusRetail” |
| Office 365 Business Office 365 Business Premium |
“O365BusinessRetail” |
Excluding applications
You may have noticed that in my example configuration.xml file I have excluded “Lync” which means Skype for business will not be installed by using the line.
You can remove this line if you do want to install S4B. Skype for business is being merged into Teams so I imagine Skype will eventually be retired. You can also exclude other applications from being installed by using the product ID’s below.
“Access”
“Excel”
“Groove”
“Lync”
“OneDrive”
“OneNote”
“Outlook”
“PowerPoint”
“Publisher”
“Word”
Download the Installation Files to the Server Share
Now that we have the configuration file setup for our needs we use the deployment tool to download the application installation files to the share. The deployment tool is used to first download the applications but is also used to install the software later on the PC’s
On the server open up command prompt or PowerShell and run the tool using
“d:”
“cd d:\software\office\officedeploymenttool”
“setup.exe /download configuration-Office365-x64.xml“
This will cause the deployment tool to download the installation files to the server share we set in the configuration xml file. This process can take a few minutes and nothing will display on the screen letting you know its finished. Just leave the command prompt open until the command completes and moves to the next line.

Once the command completes we now see a new Office folder which includes our installation files.

Launch the Installation on a PC
Next we install the application onto a test PC to ensure everything works as expected.
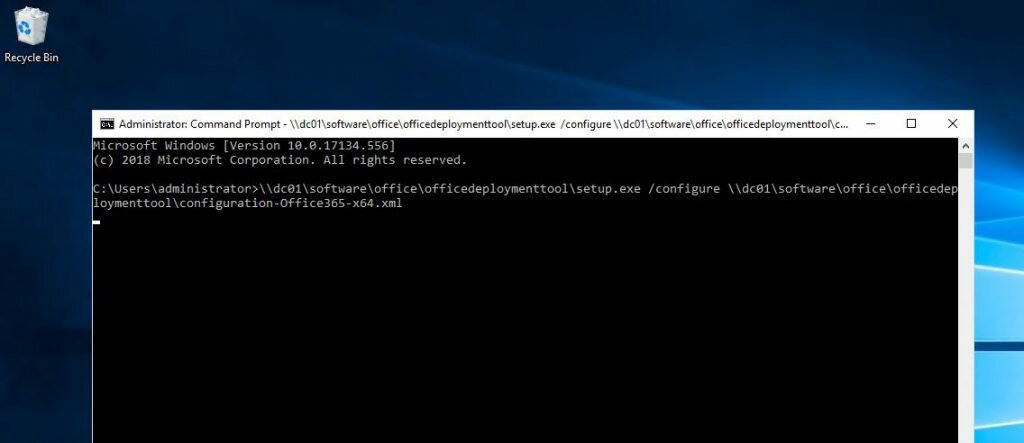
To do this load up command prompt on a test PC and run the deployment tool from the share using the /configure option and again pointing to our configuration xml file.
\\dc01\software\office\officedeploymenttool\setup.exe /configure
\\dc01\software\office\officedeploymenttool\configuration-Office365-x64.xml
This will launch the deployment tool and install office to the PC. You wont see any progress just leave the command prompt open until the command completes and moves to the next line.
After a few minutes you Office will be installed. There will be no progress bar or indication of how long is remaining. When the installation has completed the command will complete to the next prompt.
Now you can open up word it will prompt you or the end user to sign in using their Office 365 username and password.


Once the user signs in Office will activate and everything is good to go!

Conclusion
The office deployment tool is actually a really simple tool although more work is involved in getting it working compared to the old MSI file installations.
Leave a Reply